15.自定义属性配置绑定极简实现姿势介绍
使用过SpringBoot应用的小伙伴应该对它配套的配置文件application.yml不会陌生,通常我们将应用需要的配置信息,放在配置文件中,然后再应用中,就可以通过 @Value 或者 @ConfigurationProperties来引用
那么配置信息只能放在这些配置文件么? 能否从db/redis中获取配置信息呢? 又或者借助http/rpc从其他的应用中获取配置信息呢?
答案当然是可以,比如我们熟悉的配置中心(apollo, nacos, SpringCloudConfig)
接下来我们将介绍一个不借助配置中心,也可以实现自定义配置信息加载的方式,并且支持配置的动态刷新
I. 项目配置
1. 依赖
首先搭建一个标准的SpringBoot项目工程,相关版本以及依赖如下
本项目借助SpringBoot 2.2.1.RELEASE + maven 3.5.3 + IDEA进行开发
添加web支持,用于配置刷新演示
<dependencies>
    <dependency>
        <groupId>org.springframework.boot</groupId>
        <artifactId>spring-boot-starter-web</artifactId>
    </dependency>
</dependencies>
2. 启动入口
我们使用默认的配置进行测试,因此启动入口也可以使用最基础的
@SpringBootApplication
public class Application {
    public static void main(String[] args) {
        SpringApplication.run(Application.class);
    }
}
II. 自定义配置实现
1. 方案设计
我们的目标是实现一个自定义的配置信息加载,并支持配置与Spring bean对象的绑定,同时我们还需要支持这个配置的动态刷新
基于上面这个目标,要想实现则需要几个知识储备:
- 【基础系列】 实现一个自定义配置加载器(应用篇) | 一灰灰Blog
- 【基础系列】 ConfigurationProperties配置绑定中那些你不知道的事情 | 一灰灰Blog
- 【基础系列】 SpringBoot应用篇@Value注解支持配置自动刷新能力扩展 | 一灰灰Blog
- 【基础系列】 编程式属性绑定Binder | 一灰灰Blog
结合上面的知识点,我们主要需要实现的有三步:
- 读取自定义的配置
- 扫描需要绑定自定义配置的bean
- 借助Binder来重新绑定bean中的定义的属性到envionment的配置参数(这里就包含了自定义的配置及默认的配置)
2. 实现方式
为了简化自定义的配置使用,我们这里直接使用一个内存缓存来模拟自定义的配置源
2.1 加载自定义配置源
@Component
public class SelfConfigContainer implements EnvironmentAware, ApplicationContextAware {
    private ConfigurableEnvironment environment;
    private ApplicationContext applicationContext;

    @Override
    public void setEnvironment(Environment environment) {
        this.environment = (ConfigurableEnvironment) environment;
    }

    @Override
    public void setApplicationContext(ApplicationContext applicationContext) throws BeansException {
        this.applicationContext = applicationContext;
    }

    public Map<String, Object> configCache = new HashMap<>();

    @PostConstruct
    public void init() {
        configCache.put("config.type", 12);
        configCache.put("config.wechat", "一灰灰blog");

        MutablePropertySources propertySources = new MutablePropertySources(environment.getPropertySources());
        // 将内存的配置信息设置为最高优先级
        MapPropertySource propertySource = new MapPropertySource(namespace, cache);
        propertySources.addFirst(propertySource);
    }
}
注意上面的实现,这里是自定义的配置源 propertySources 中包含了environment的配置信息;如果希望将自定义的配置信息源注入到environment,可以如下实现
MapPropertySource propertySource = new MapPropertySource("selfSource", SelfConfigContext.getInstance().getCache());
environment.getPropertySources().addFirst(propertySource);
2.2 扫描需要绑定bean
接下来我们自定义一个注解@ConfDot, 凡是带有这个注解的bean的成员变量,从上面的属性源中进行初始化
这个注解可以完全按照@ConfigurationProperties的来设计(实际上我们也可以直接使用@ConfigurationProperties注解,这样适用范围更广了)
@Target({ElementType.TYPE, ElementType.METHOD})
@Retention(RetentionPolicy.RUNTIME)
@Documented
public @interface ConfDot {
    @AliasFor("prefix")
    String value() default "";

    @AliasFor("value")
    String prefix() default "";

    boolean ignoreInvalidFields() default false;

    boolean ignoreUnknownFields() default true;
}
然后借助Spring来扫描带有特定注解的bean,就可以很简单了
applicationContext.getBeansWithAnnotation(ConfDot.class).values().forEach(bean -> {
    Bindable<?> target = Bindable.ofInstance(bean)
            .withAnnotations(AnnotationUtils.findAnnotation(bean.getClass(), ConfDot.class));
    selfConfigBinder.bind(target);
});
2.3 bean与配置的绑定
上面两部完成之后,接下来就需要我们将配置与bean进行绑定,这里就主要使用Binder来实现我们的预期功能了
实现一个自定义的绑定工具类
public class SelfConfigBinder {
    private final ApplicationContext applicationContext;
    private PropertySources propertySource;

    private volatile Binder binder;

    public SelfConfigBinder(ApplicationContext applicationContext, PropertySources propertySource) {
        this.applicationContext = applicationContext;
        this.propertySource = propertySource;
    }

    public <T> void bind(String prefix, Bindable<T> bindable) {
        getBinder().bind(prefix, bindable, new IgnoreTopLevelConverterNotFoundBindHandler());
    }

    public <T> void bind(Bindable<T> bindable) {
        ConfDot propertiesAno = bindable.getAnnotation(ConfDot.class);
        if (propertiesAno != null) {
            BindHandler bindHandler = getBindHandler(propertiesAno);
            getBinder().bind(propertiesAno.prefix(), bindable, bindHandler);
        }
    }

    private BindHandler getBindHandler(ConfDot annotation) {
        BindHandler handler = new IgnoreTopLevelConverterNotFoundBindHandler();
        if (annotation.ignoreInvalidFields()) {
            handler = new IgnoreErrorsBindHandler(handler);
        }
        if (!annotation.ignoreUnknownFields()) {
            UnboundElementsSourceFilter filter = new UnboundElementsSourceFilter();
            handler = new NoUnboundElementsBindHandler(handler, filter);
        }
        return handler;
    }

    private Binder getBinder() {
        if (this.binder == null) {
            synchronized (this) {
                if (this.binder == null) {
                    this.binder = new Binder(getConfigurationPropertySources(),
                            getPropertySourcesPlaceholdersResolver(), getConversionService(),
                            getPropertyEditorInitializer());
                }
            }
        }
        return this.binder;
    }

    private Iterable<ConfigurationPropertySource> getConfigurationPropertySources() {
        return ConfigurationPropertySources.from(this.propertySource);
    }

    /**
     * 指定占位符的前缀、后缀、默认值分隔符、未解析忽略、环境变量容器
     *
     * @return
     */
    private PropertySourcesPlaceholdersResolver getPropertySourcesPlaceholdersResolver() {
        return new PropertySourcesPlaceholdersResolver(this.propertySource);
    }

    /**
     * 类型转换
     *
     * @return
     */
    private ConversionService getConversionService() {
        return new DefaultConversionService();
    }

    private Consumer<PropertyEditorRegistry> getPropertyEditorInitializer() {
        if (this.applicationContext instanceof ConfigurableApplicationContext) {
            return ((ConfigurableApplicationContext) this.applicationContext)
                    .getBeanFactory()::copyRegisteredEditorsTo;
        }
        return null;
    }
}
上面的实现虽然多,但是核心其实比较简单:
- 初始化Binder对象
this.binder = new Binder(getConfigurationPropertySources(), getPropertySourcesPlaceholdersResolver(), getConversionService(), getPropertyEditorInitializer()); - 提供绑定入口
public <T> void bind(Bindable<T> bindable) {
    ConfDot propertiesAno = bindable.getAnnotation(ConfDot.class);
    if (propertiesAno != null) {
        // bindHandler即绑定的处理策略,如没有映射到时,怎么处理
        BindHandler bindHandler = getBindHandler(propertiesAno);
        getBinder().bind(propertiesAno.prefix(), bindable, bindHandler);
    }
}
2.4 完整实现
上面的三步实现,基本上已经将整个功能给实现了,其中SelfConfigBinder提供了完成的代码实现,接下来我们再将第一步与第三步的整合,来看一下完整的实现,并且提供一个配置刷新的支持
@Component
public class SelfConfigContainer implements EnvironmentAware, ApplicationContextAware {
    private ConfigurableEnvironment environment;
    private ApplicationContext applicationContext;

    @Override
    public void setEnvironment(Environment environment) {
        this.environment = (ConfigurableEnvironment) environment;
    }

    @Override
    public void setApplicationContext(ApplicationContext applicationContext) throws BeansException {
        this.applicationContext = applicationContext;
    }

    private SelfConfigBinder binder;
    public Map<String, Object> configCache = new HashMap<>();

    @PostConstruct
    public void init() {
        configCache.put("config.type", 12);
        configCache.put("config.wechat", "一灰灰blog");
        bindBeansFromLocalCache("config", configCache);
    }

    private void bindBeansFromLocalCache(String namespace, Map<String, Object> cache) {
        MutablePropertySources propertySources = new MutablePropertySources(environment.getPropertySources());
        // 将内存的配置信息设置为最高优先级
        MapPropertySource propertySource = new MapPropertySource(namespace, cache);
        propertySources.addFirst(propertySource);
        this.binder = new SelfConfigBinder(this.applicationContext, propertySources);
        refreshConfig(null, null);
    }

    /**
     * 配置绑定
     *
     * @param bindable
     */
    public void bind(Bindable bindable) {
        binder.bind(bindable);
    }

    /**
     * 支持配置的动态刷新
     *
     * @param key
     * @param val
     */
    public void refreshConfig(String key, String val) {
        if (key != null) {
            configCache.put(key, val);
        }
        applicationContext.getBeansWithAnnotation(ConfDot.class).values().forEach(bean -> {
            Bindable<?> target = Bindable.ofInstance(bean)
                    // Bindable.of(ResolvableType.forClass(bean.getClass())).withExistingValue(bean)
                    .withAnnotations(AnnotationUtils.findAnnotation(bean.getClass(), ConfDot.class));
            bind(target);
        });
    }
}
3. 测试验证
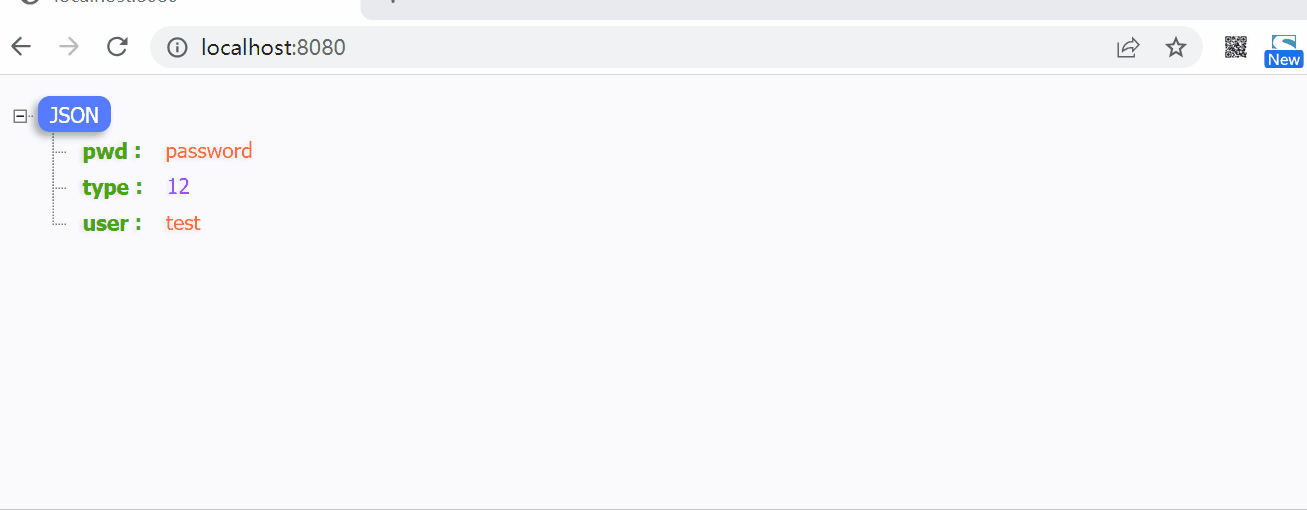
接下来就是验证一下上面的设计,首先再配置文件中,添加几个默认的信息
config:
  user: test
  pwd: password
绑定配置的bean对象
@Data
@Component
@ConfDot(prefix = "config")
public class MyConfig {

    private String user;

    private String pwd;

    private Integer type;
}
上面这个MyConfig中的 user, pwd 从前面的配置文件中获取,然后type则此自定义的配置信息configCache中获取,应该是12,接下来我们首先一个访问与刷新的接口
@Slf4j
@RestController
public class IndexController {
    @Autowired
    private MyConfig myConfig;

    @GetMapping(path = "/")
    public String hello() {
        return JSON.toJSONString(myConfig);
    }

    @GetMapping(path = "update")
    public String updateCache(String key, String val) {
        selfConfigContainer.refreshConfig(key, val);
        return hello();
    }
}
实际执行测试如下图