13.基于maven多环境配置
SpringBoot系列之基于maven多环境配置
实际开发过程中,配置的多环境区分属于标配了,当我们不考虑配置中心时,将多环境的配置就放在项目的resource目录下,那么可以怎样做多环境的配置管理呢?
之前介绍过一篇基于 spring.profiles.active 配置来选择对应的配置文件的方式,有了解这个配置的小伙伴可以很快找到这种方式的特点
如配置值为dev,则加载 application-dev.yml 配置文件,如果为prod,则加载application-prod.yml
那么缺点就很明显了,当我每个环境的配置很多时,上面这种方式真的好用么?
接下来本文介绍另外一种常见的基于maven的多环境配置方式
I. 项目搭建
1. 项目依赖
本项目借助SpringBoot 2.2.1.RELEASE + maven 3.5.3 + IDEA进行开发
开一个web服务用于测试
<dependencies>
    <dependency>
        <groupId>org.elasticsearch.client</groupId>
        <artifactId>elasticsearch-rest-high-level-client</artifactId>
    </dependency>
    <dependency>
        <groupId>org.springframework.boot</groupId>
        <artifactId>spring-boot-starter-thymeleaf</artifactId>
    </dependency>
</dependencies>
一个简单的页面模板 resources/templates/index.html
<!DOCTYPE html>
<html xmlns:th="http://www.thymeleaf.org">
<head>
    <meta charset="UTF-8">
    <meta name="viewport" content="width=device-width, initial-scale=1">
    <meta name="description" content="SpringBoot thymeleaf"/>
    <meta name="author" content="YiHui"/>
    <meta name="viewport" content="width=device-width, initial-scale=1.0"/>
    <title>YiHui's SpringBoot Demo</title>
</head>
<body>
  <div>
    <div class="title">hello world!</div>
    <br/>
    <div class="content" th:text="'配置信息:' + ${info}">默认的内容</div>
    <br/>
    <div class="sign" th:text="'当前时间' + ${now}">默认的签名</div>
    <br/>
  </div>
</body>
</html>
2. 多环境配置
其次需要在pom.xml文件中,添加<profiles>,用于定义各种环境
<profiles>
    <!-- 开发 -->
    <profile>
        <id>dev</id>
        <properties>
            <env>dev</env>
        </properties>
        <activation>
            <activeByDefault>true</activeByDefault>
        </activation>
    </profile>
    <!-- 测试 -->
    <profile>
        <id>test</id>
        <properties>
            <env>test</env>
        </properties>
    </profile>
    <!-- 预发 -->
    <profile>
        <id>pre</id>
        <properties>
            <env>pre</env>
        </properties>
    </profile>
    <!-- 生产 -->
    <profile>
        <id>prod</id>
        <properties>
            <env>prod</env>
        </properties>
    </profile>
</profiles>

<build>
    <resources>
        <resource>
            <directory>src/main/resources</directory>
        </resource>
        <resource>
            <directory>src/main/resources-env/${env}</directory>
            <filtering>true</filtering>
        </resource>
    </resources>
</build>
上面定义了四个环境,默认处于dev开发环境
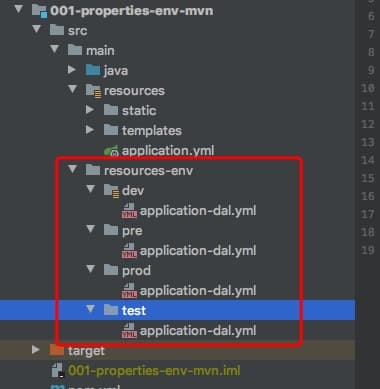
其次就是build标签中的resource,用于指定不同环境下的资源存放位置;在resources目录下的配置文件如下
spring:
  profiles:
    active: dal
上面这个表示会加载application-dal.yml配置文件;接下来看下不同环境中这个配置文件的具体存放位置如下
dev环境配置:
spring:
  datasource:
    url: jdbc:mysql://127.0.0.1:3306/story?useUnicode=true&characterEncoding=UTF-8&useSSL=false&serverTimezone=Asia/Shanghai
    username: root
    password:
pre环境配置
spring:
  datasource:
    url: jdbc:mysql://pre.hhui.top/story?useUnicode=true&characterEncoding=UTF-8&useSSL=false&serverTimezone=Asia/Shanghai
    username: pre_root
    password:
prod环境配置
spring:
  datasource:
    url: jdbc:mysql://prod.hhui.top/story?useUnicode=true&characterEncoding=UTF-8&useSSL=false&serverTimezone=Asia/Shanghai
    username: prod_root
    password:
test环境配置
spring:
  datasource:
    url: jdbc:mysql://test.hhui.top/story?useUnicode=true&characterEncoding=UTF-8&useSSL=false&serverTimezone=Asia/Shanghai
    username: test_root
    password:
上面四个配置文件的主要区别在于username
II. 环境选择验证
1.配置类
首先基于Spring AutoConfig定义一个配置属性类,用于映射application-dal.yml对应的配置
@Data
@ConfigurationProperties(prefix = "spring.datasource")
public class DalConfig {
    private String url;

    private String username;

    private String password;
}
2. 测试端点
写一个简单的测试端点,输出配置值
*/
@Controller
@EnableConfigurationProperties({DalConfig.class})
@SpringBootApplication
public class Application {
    private DalConfig dalConfig;

    public Application(DalConfig dalConfig, Environment environment) {
        this.dalConfig = dalConfig;
        System.out.println(dalConfig);
    }

    public static void main(String[] args) {
        SpringApplication application = new SpringApplication(Application.class);
        application.run(args);
    }


    @GetMapping(path = {"", "/", "/index"})
    public ModelAndView index() {
        Map<String, Object> data = new HashMap<>(2);
        data.put("info", dalConfig);
        data.put("now", LocalDateTime.now().toString());
        return new ModelAndView("index", data);
    }
}
3. 启动测试
项目启动之后,默认的是dev环境,此时访问之后结果如下

接下来如果我想启动test环境,可以如下操作
- idea右边maven,选中对应的环境
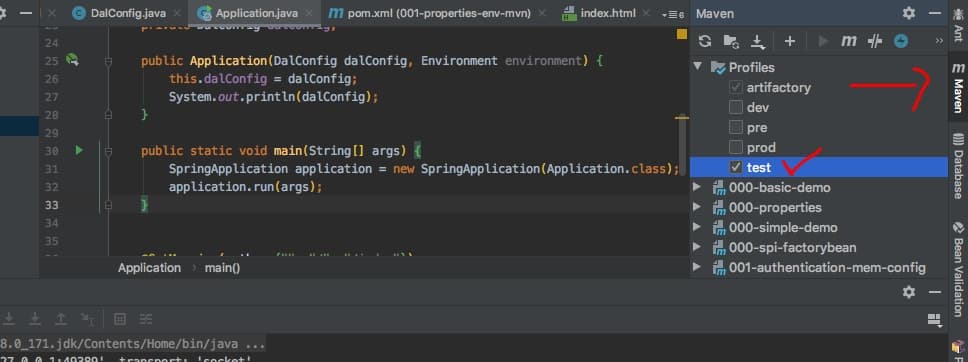
再次启动测试一下

上面说的是idea启动测试,那么实际打包的时候怎么整呢?
mvn clean package -DskipTests=true -P dev
关键就是上面的 -P 来指定具体的环境
4. 小结
最后小结一下本文介绍到基于mvn的环境配置策略,这里主要的知识点都在pom.xml中,指定profiles,然后在打包的时候通过-P确定具体的环境
在最终打包时,只会将对应环境的配置文件打到jar包中
III. 不能错过的源码和相关知识点
0. 项目
相关博文
项目源码
- 工程:https://github.com/liuyueyi/spring-boot-demo
- 源码:https://github.com/liuyueyi/spring-boot-demo/tree/master/spring-boot/001-properties-env-mvn
1. 微信公众号: 一灰灰Blog
尽信书则不如,以上内容,纯属一家之言,因个人能力有限,难免有疏漏和错误之处,如发现bug或者有更好的建议,欢迎批评指正,不吝感激
下面一灰灰的个人博客,记录所有学习和工作中的博文,欢迎大家前去逛逛
- 一灰灰Blog个人博客 https://blog.hhui.top
- 一灰灰Blog-Spring专题博客 http://spring.hhui.top
