5.一文教你如何在SpringBoot中使用WebSocket发送消息!
前面介绍的几篇是消息广播,所有在群组内的小伙伴都可以收到消息;那么如果后台只想给某个用户私发消息,可以怎么实现呢?
本文将主要介绍服务端如何给客户端发送消息
I. 实例演示
1. 项目搭建
项目搭建过程与前文类似,请直接参考上文 或者 查看文末的项目源码
2. WebSocket配置
核心的websocket配置依然与之前一致,实现WebSocketMessageBrokerConfigurer接口,定义端点、消息代理、认证授权拦截器
@Configuration
@EnableWebSocketMessageBroker
public class StompConfiguration implements WebSocketMessageBrokerConfigurer {

    /**
     * 这里定义的是客户端接收服务端消息的相关信息
     *
     * @param registry
     */
    @Override
    public void configureMessageBroker(MessageBrokerRegistry registry) {
        // 消息代理指定了客户端订阅地址,前端订阅的就是这个路径, 接收后端发送的消息
        // 对应 index.js中的 stompClient.subscribe('/topic/hello'
        registry.enableSimpleBroker("/topic");

        // 表示配置一个或多个前缀,通过这些前缀过滤出需要被注解方法处理的消息。
        // 例如,前缀为 /app 的 destination 可以通过@MessageMapping注解的方法处理,
        // 而其他 destination (例如 /topic /queue)将被直接交给 broker 处理
        registry.setApplicationDestinationPrefixes("/app");
    }

    /**
     * 添加一个服务端点,来接收客户端的连接
     * 即客户端创建ws时,指定的地址, let socket = new WebSocket("ws://ws/hello");
     *
     * @param registry
     */
    @Override
    public void registerStompEndpoints(StompEndpointRegistry registry) {
        // Endpoint指定了客户端建立连接时的请求地址
        registry.addEndpoint("/ws/chat/{channel}", "/video/{target}")
                // 用于设置连接的用户身份识别
                .setHandshakeHandler(new AuthHandshakeHandler())
                // 设置拦截器,从cookie中识别出登录用户
                .addInterceptors(authHandshakeInterceptor())
                .withSockJS();
    }

    @Bean
    public AuthHandshakeInterceptor authHandshakeInterceptor() {
        return new AuthHandshakeInterceptor();
    }
}
3. 消息发送
3.1 @SendTo 返回消息
对于服务器若需要将消息发送给客户端,最简单的方式就是接收消息时,直接返回,如
/**
 * 当接受到客户端发送的消息时, 发送的路径是: /app/hello (这个/app前缀是 StompConfiguration 中的配置的)
 * 将返回结果推送给所有订阅了 /topic/hello 的消费者
 *
 * @param content
 * @return
 */
@MessageMapping("/hello")
@SendTo("/topic/hello")
public String sayHello(String content) {
    return "resp: " + content + " | " + LocalDateTime.now();
}
上面这个实现,即表示接收 /app/hello 发送的消息,然后将结果转发给所有订阅了 /topic/hello 的客户端
3.2 SimpMessagingTemplate 返回消息
若我们希望更灵活的返回消息,比如后台主动的返回消息,此时则可以借助Spring封装的SimpMessagingTemplate来实现消息回传
直接通过@Autowired的方式注入
@Component
public class WsAnswerHelper {
    @Autowired
    private SimpMessagingTemplate simpMessagingTemplate;
    @PostConstruct
    public void init() {
        WsAnswerHelper.instance = this;
    }

    public static void publish(String destination, Object msg) {
        instance.simpMessagingTemplate.convertAndSend(destination, msg);
    }

    public static void publish(String user, String destination, Object msg) {
        instance.simpMessagingTemplate.convertAndSendToUser(user, destination, msg);
    }
}
上面的工具类,主要封装了官方提供的两种返回方式
// 向目标地址广播消息
public void convertAndSend(D destination, Object payload);

// 给特定用户发送消息
public void convertAndSendToUser(String user, String destination, Object payload);
虽然上面提供了两种方式,但是看一下convertAndSendToUser的源码实现会发现,它的底层依然调用的是convertAndSend,向特定用户发送消息,无非就是调整 destination 的取值

重点看一下destination的取值 = this.destinationPrefix + user + destination = "/user/" + user + destination
所以当我们希望给特定用户发送消息时;需要用户订阅 /user/destination 的地址, 如下
stompClient.subscribe(`/user/topic/notify`, function (message) {
    // 订阅用户的私人broker,用于接收系统私发消息; 后台通过向 /user/xxx/topic/notify 发送消息,来传递给某个私人用户
    console.log("系统消息: ", message);
    showGreeting('systemMsg', message.body);
});
对于客户端而言,虽然我订阅的是 /user/topic/notify, 但是后台返回消息的目的地,实际上则是 /user/xxxx/topic/notify ,其中的xxx则是用户标识
现在的问题就是,这个用户的标识,是怎么确定的呢?
- 主要就是我们前面做用户身份鉴权中介绍到的
HandshakeHandler中定义的Principal - 在webscoket的生命周期内,通过Principal来识别用户身份,当需要向后端发送消息时,也是基于它来确定user
4. 使用实例
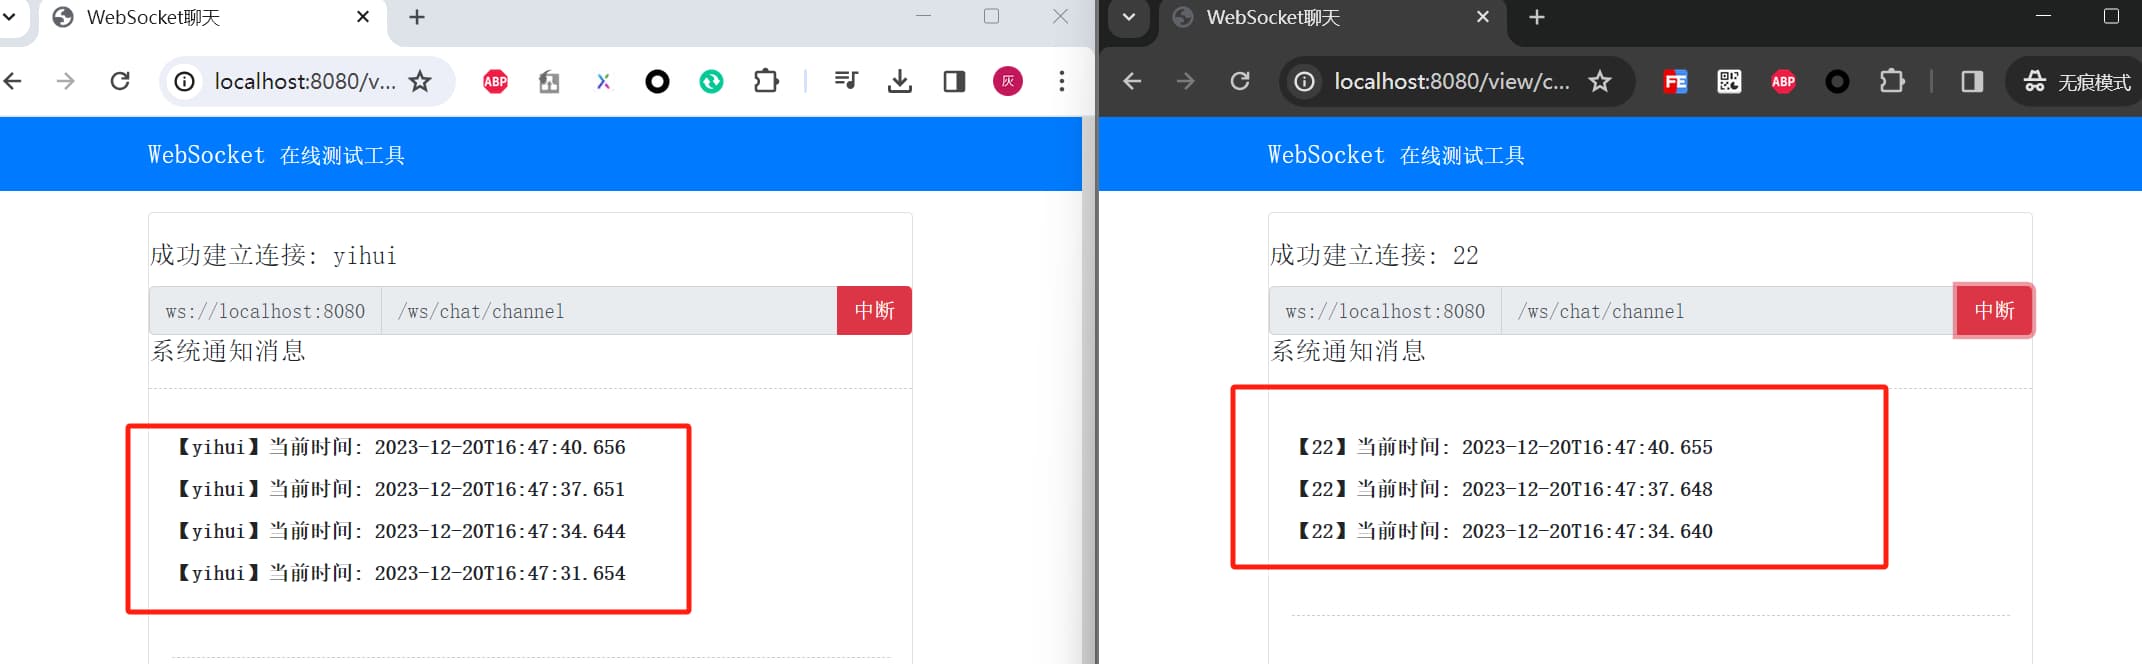
比如写一个定时器,给每个3s给当前登录的用户报时
@Slf4j
@Service
public class UserService {
    /**
     * 用户登录缓存:key 用户名 value sessionId
     */
    private Map<String, String> userCache;
    @Scheduled(fixedRate = 3000)
    public void autoSendMsgToUser() {
        userCache.keySet().forEach(uname -> {
            log.info("用户广播消息: {}", uname);
            WsAnswerHelper.publish(uname, "/topic/notify", String.format("【%s】当前时间: %s", uname, LocalDateTime.now()));
            try {
                Thread.sleep(1);
            } catch (InterruptedException e) {
                throw new RuntimeException(e);
            }
        });
    }
}
5. 小结
本文主要介绍的是后端如何给客户端发送消息,其中重点介绍了一下当我们希望给用户私发消息时,可以借助simpMessagingTemplate.convertAndSendToUser来实现,当然对应的用户也需要订阅/user/xxx的channel
到目前位置,我们的所有聊天还局限于文本的交流,如果我们希望传图,可以怎么做呢?