本文记录一下将jar上传到maven中央仓库的全过程,文中项目依托在github上,使用的是mac环境 (关于maven、jdk的环境配置不属于本文内容)
1. sonatype账号申请
首先我们需要申请一个账号,地址为: https://issues.sonatype.org/secure/Signup!default.jspa
请记住这个账号的用户名 + 密码,在后续的maven的setting.xml配置文件中需要用到
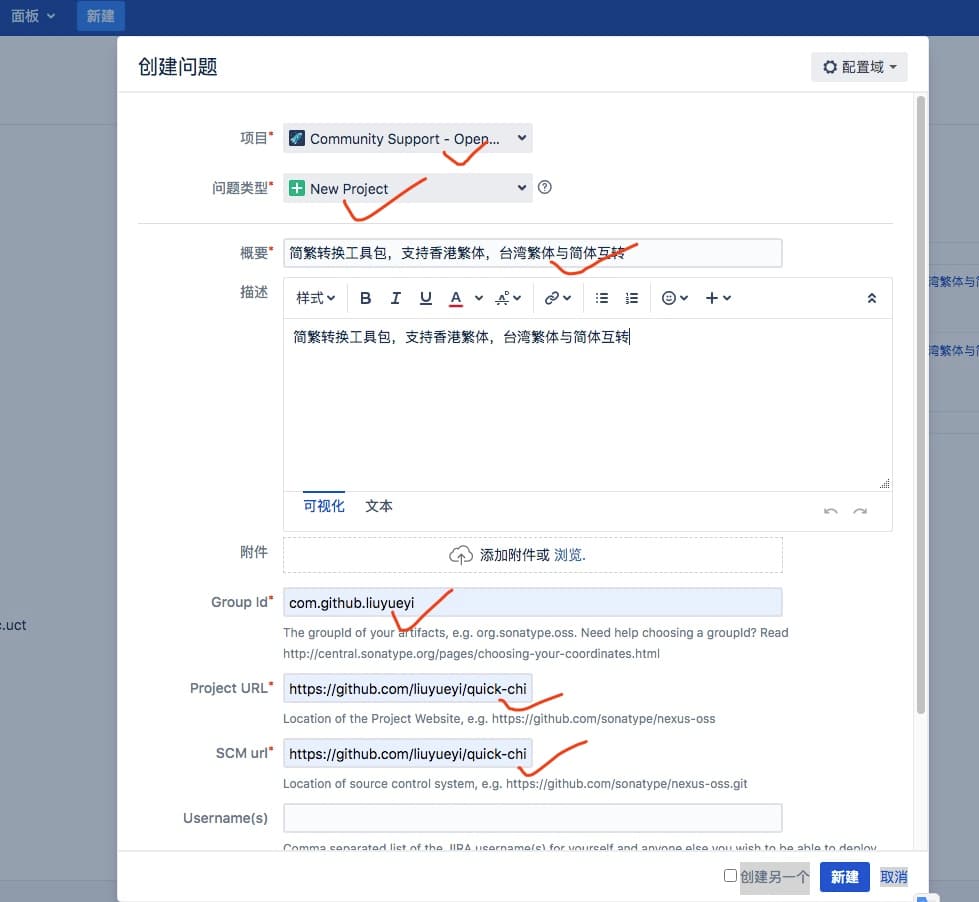
账号申请完毕之后,点击新建按钮(如果是因为的话,就是create),提交一个issue
- 项目:选择
Community Support - Open Source Project Repository Hosting (OSSRH)
- 问题类型:选择
New Project
- 概要:项目说明
- 描述:项目说明
- GroupId: 请注意,对于github项目而言,前缀都是
com.github,后面跟着的是你的账号名,比如我的账号是liuyueyi,所以我的groupId是 com.github.liuyueyi,如果不满足这个规则将无法通过后续的审核
Project URL: 项目地址,填对应的github连接 https://github.com/liuyueyi/quick-chinese-transferSCM URL: 和上面的基本一致,只是多了一个.git
基本上需要配置的东西如下图,最后点击新建即可
上面提交之后,等待审核即可
2. GPG安装
在后续的上传jar包时,需要利用gpg进行签名,下面介绍一下mac的安装流程
推荐用法
macos安装可以借助homebrew来实现
备选方案
但是我的mac系统比较老,使用上面的方式安装失败,直接抛了异常,根据搜索结果来看,不升级系统貌似没有什么好的解决办法
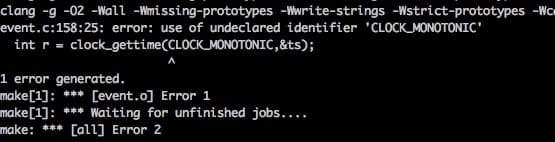
下面是采用安装包的方式,原则上建议到官网去下载安装包,依然是因为版本问题,最新的我也安装不上,所以找了一个历史的下载网址,(不保证这个网站上的安装包的安全性。虽然我自己用的也是它)
如有需要,可以跳转: https://sourceforge.net/p/gpgosx/docu/Download/
我选择的是2.2.12版本,安装完毕之后,可以查看一下里面的readme文件,查看具体的安装路径
比如在我的电脑上安装路径为: /usr/local/gnupg-2.2/bin,为了方便使用,可以设置一下环境
1
2
3
4
5
6
| vim ~/.bash_profile
PATH=$PATH:/usr/local/gnupg-2.2/bin
source ~/.bash_profile
|
密钥生成及发布
安装完毕之后,设置我们自己的密钥
查看本地密钥
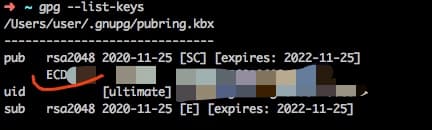
上图中勾住的就是我们的公钥id,接下来将公钥id上传到密钥服务器
1
2
3
4
5
|
gpg --keyserver hkp://keyserver.ubuntu.com:11371 --send-keys 公钥ID
gpg --keyserver hkp://keyserver.ubuntu.com:11371 --recv-keys 公钥ID
|

3. maven配置
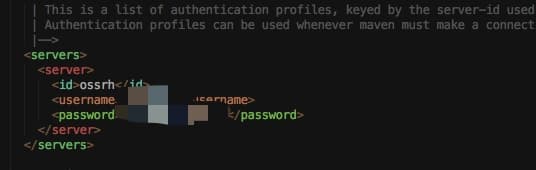
接下来,我们需要设置一下我们的maven配置文件setting.xml,将我们的用户信息填写进去
添加第一步中申请的账号信息,(用户名+密码就是第一步申请的账号密码)
1
2
3
4
5
6
7
8
9
| # 添加账号信息
<servers>
<server>
<id>ossrh</id>
<username>user</username>
<password>password</password>
</server>
</servers>
|
4. 项目配置
前面的步骤属于大的环境相关,接下来就需要在我们的实际项目中,配置必要的信息了,这里以https://github.com/liuyueyi/quick-chinese-transfer的配置为实例进行说明
1
2
3
4
5
6
7
8
9
10
11
12
13
14
15
16
17
18
19
20
21
22
23
24
25
26
27
28
29
30
31
32
33
34
35
36
37
38
39
40
41
42
43
44
45
46
47
48
49
50
51
52
53
54
55
56
57
58
59
60
61
62
63
64
65
66
67
68
69
70
71
72
73
74
75
76
77
78
79
80
81
82
83
84
85
86
87
88
89
90
91
92
93
94
95
96
97
98
99
100
101
102
103
104
105
106
107
108
109
110
111
112
113
114
115
116
117
118
119
120
121
122
123
124
125
126
127
128
129
130
131
132
133
134
135
136
137
138
139
140
141
142
143
144
145
146
147
148
149
150
151
152
153
154
155
156
157
158
159
160
161
162
163
164
165
166
167
168
169
170
171
172
173
174
175
176
177
178
179
180
181
182
183
184
185
186
187
188
189
190
191
192
193
194
195
196
| <?xml version="1.0" encoding="UTF-8"?>
<project xmlns="http://maven.apache.org/POM/4.0.0"
xmlns:xsi="http://www.w3.org/2001/XMLSchema-instance"
xsi:schemaLocation="http://maven.apache.org/POM/4.0.0 http://maven.apache.org/xsd/maven-4.0.0.xsd">
<modelVersion>4.0.0</modelVersion>
<groupId>com.github.liuyueyi</groupId>
<artifactId>quick-chinese-transfer</artifactId>
<packaging>pom</packaging>
<version>0.1</version>
<modules>
<module>transfer-core</module>
</modules>
<name>quick-chinese-transfer</name>
<description>
A Java library supporting conversion between Simplified-Chinese, Traditional-Chinese
</description>
<url>https://github.com/liuyueyi/quick-chinese-transfer</url>
<licenses>
<license>
<name>The Apache Software License, Version 2.0</name>
<url>http://www.apache.org/licenses/LICENSE-2.0.txt</url>
<distribution>repo</distribution>
</license>
</licenses>
<issueManagement>
<system>github</system>
<url>https://github.com/liuyueyi/quick-chinese-transfer/issues</url>
</issueManagement>
<scm>
<connection>scm:git:https://github.com/liuyueyi/quick-chinese-transfer.git</connection>
<developerConnection>scm:git:https://github.com/liuyueyi/quick-chinese-transfer.git</developerConnection>
<url>https://github.com/liuyueyi/quick-chinese-transfer</url>
</scm>
<developers>
<developer>
<name>YiHui</name>
<email>bangzewu@126.com</email>
<url>http://blog.hhui.top</url>
</developer>
</developers>
<properties>
<project.build.sourceEncoding>UTF-8</project.build.sourceEncoding>
<project.reporting.outputEncoding>UTF-8</project.reporting.outputEncoding>
<java.version>1.8</java.version>
</properties>
<build>
<pluginManagement>
<plugins>
<plugin>
<groupId>org.apache.maven.plugins</groupId>
<artifactId>maven-compiler-plugin</artifactId>
<configuration>
<source>1.8</source>
<target>1.8</target>
</configuration>
</plugin>
<plugin>
<groupId>org.apache.maven.plugins</groupId>
<artifactId>maven-release-plugin</artifactId>
<configuration>
<mavenExecutorId>forked-path</mavenExecutorId>
<useReleaseProfile>false</useReleaseProfile>
<arguments>-Psonatype-oss-release</arguments>
</configuration>
</plugin>
<plugin>
<groupId>org.apache.maven.plugins</groupId>
<artifactId>maven-source-plugin</artifactId>
<version>3.1.0</version>
<inherited>true</inherited>
<executions>
<execution>
<id>attach-sources</id>
<goals>
<goal>jar</goal>
</goals>
</execution>
</executions>
<configuration>
<excludeResources>true</excludeResources>
<useDefaultExcludes>true</useDefaultExcludes>
</configuration>
</plugin>
<plugin>
<groupId>org.apache.maven.plugins</groupId>
<artifactId>maven-javadoc-plugin</artifactId>
<version>3.0.0</version>
<inherited>true</inherited>
<executions>
<execution>
<id>bundle-sources</id>
<phase>package</phase>
<goals>
<goal>jar</goal>
</goals>
</execution>
</executions>
<configuration>
<maxmemory>1024</maxmemory>
<encoding>UTF-8</encoding>
<show>protected</show>
<notree>true</notree>
<failOnError>false</failOnError>
<doclint>none</doclint>
</configuration>
</plugin>
</plugins>
</pluginManagement>
<plugins>
<plugin>
<groupId>org.codehaus.mojo</groupId>
<artifactId>cobertura-maven-plugin</artifactId>
<version>2.7</version>
<configuration>
<formats>
<format>html</format>
<format>xml</format>
</formats>
<check/>
</configuration>
</plugin>
<plugin>
<groupId>org.apache.maven.plugins</groupId>
<artifactId>maven-resources-plugin</artifactId>
<version>3.1.0</version>
<configuration>
<encoding>UTF-8</encoding>
</configuration>
</plugin>
<plugin>
<groupId>org.apache.maven.plugins</groupId>
<artifactId>maven-compiler-plugin</artifactId>
</plugin>
<plugin>
<groupId>org.apache.maven.plugins</groupId>
<artifactId>maven-javadoc-plugin</artifactId>
</plugin>
<plugin>
<groupId>org.apache.maven.plugins</groupId>
<artifactId>maven-source-plugin</artifactId>
</plugin>
</plugins>
</build>
<distributionManagement>
<repository>
<id>ossrh</id>
<url>https://oss.sonatype.org/service/local/staging/deploy/maven2/</url>
</repository>
<snapshotRepository>
<id>ossrh</id>
<url>https://oss.sonatype.org/content/repositories/snapshots</url>
</snapshotRepository>
</distributionManagement>
<profiles>
<profile>
<id>release</id>
<build>
<plugins>
<plugin>
<groupId>org.apache.maven.plugins</groupId>
<artifactId>maven-gpg-plugin</artifactId>
<version>1.6</version>
<executions>
<execution>
<id>sign-artifacts</id>
<phase>verify</phase>
<goals>
<goal>sign</goal>
</goals>
</execution>
</executions>
</plugin>
</plugins>
</build>
</profile>
</profiles>
</project>
|
上面是一个完整的配置信息,其中,非常核心的几个点
groupId: 请注意与申请的保持一致plugins: 我们上传的jar包,需要包含doc和源码,所以maven-source-plugin + maven-javadoc-plugin必不可少maven-gpg-plugin: 签名的插件,必要
在我的实际项目开发过程中,这里遇到了一个问题,maven-gpg-plugin下载不下来一直标红,如果遇到这种问题,可以定向下载
1
| mvn dependency:get -DrepoUrl=http://repo.maven.apache.org/maven2/ -Dartifact=org.apache.maven.plugins:maven-gpg-plugin:1.6
|
除此之外,还可以通过idea设置 -> maven -> Repositories 更新依赖

上面这个配置完毕之后,就是打包上传,直接使用以下命令即可
1
| mvn clean deploy -DskipTests=true -P release
|
这个命令执行过程中,会弹出一个输入gpg密码的弹窗,输入我们第二步中生成gpg密钥时,填写的密码即可
jar包上传完毕之后,就可以在https://oss.sonatype.org/看到了
注意
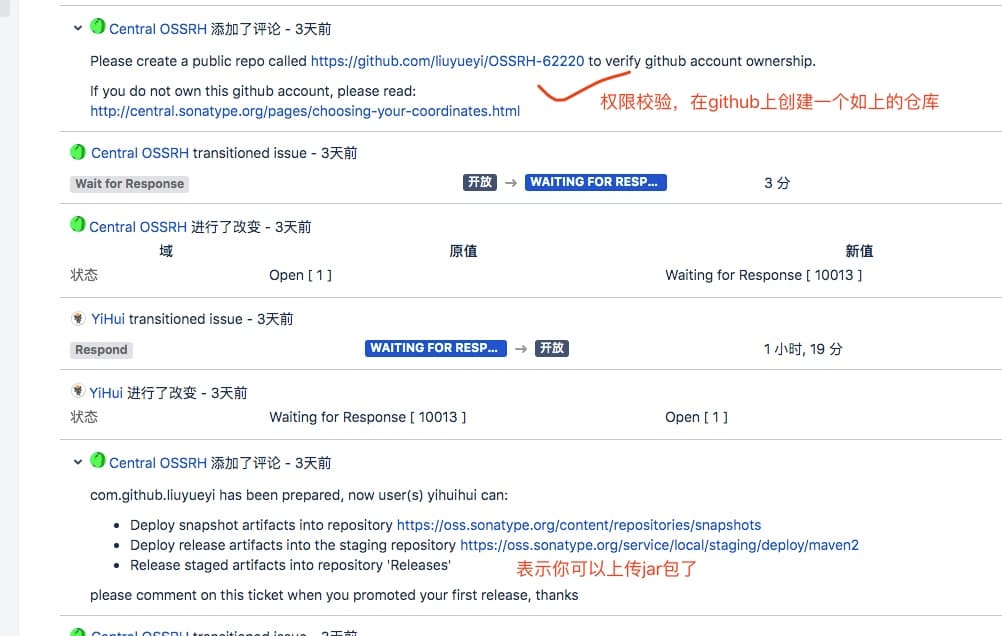
当我们第一步提交的issues审核之后,会有一个邮件通知你,可以发布对应的jar包了,也可以在issues看到下面的回复,一般有下面两步
- 提示你在github上创建一个权限验证的空的仓库
- 创建完毕之后,改变issue状态
- 提示你可以上传jar包了
- 接着执行上面的jar包发布
5. jar包发布
接下来登录 https://oss.sonatype.org/#stagingRepositories 管理我们上传的jar包
- 点击
Staging Repositories
- 选中我们需要发布的jar
- 点击close
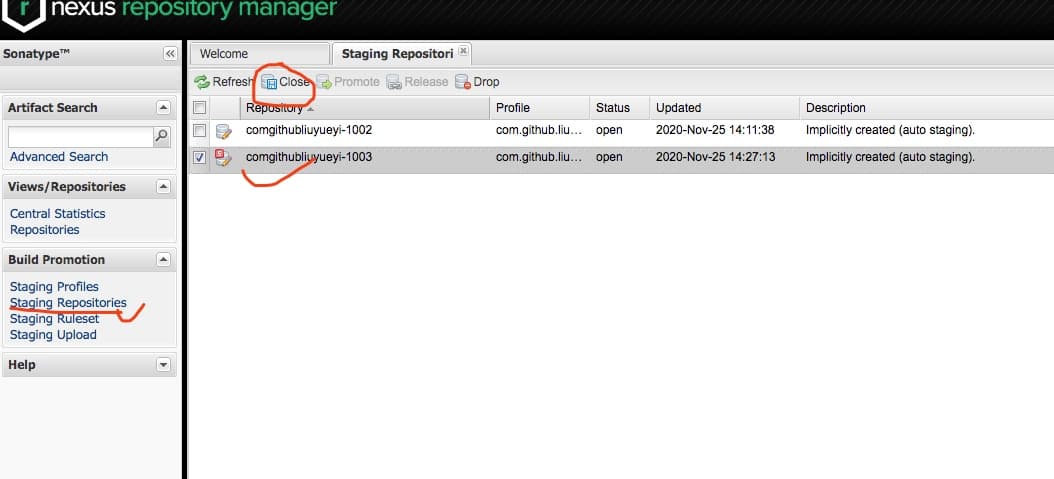
close点击完毕之后,如果一切正常,那么等待一段时间之后,就可以发现release按钮可以点击了,然后点击release发布即可
如果一切顺利,我们会收到一个邮件,告诉我们发布成功,准备同步jar包了
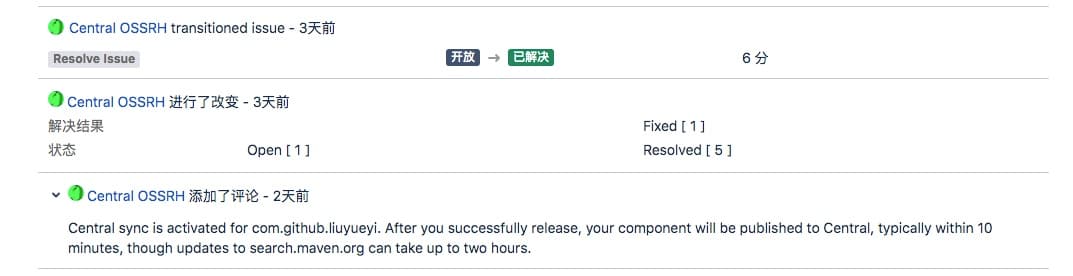
然后等十来分钟,就可以直接依赖导入jar包了
1
2
3
4
5
| <dependency>
<groupId>com.github.liuyueyi</groupId>
<artifactId>quick-transfer-core</artifactId>
<version>0.1</version>
</dependency>
|
注意
关于上面这个发布,有可能没有那么顺利,比如我之前遇到了几个问题,点击选中包的Activites可以查看失败的原因
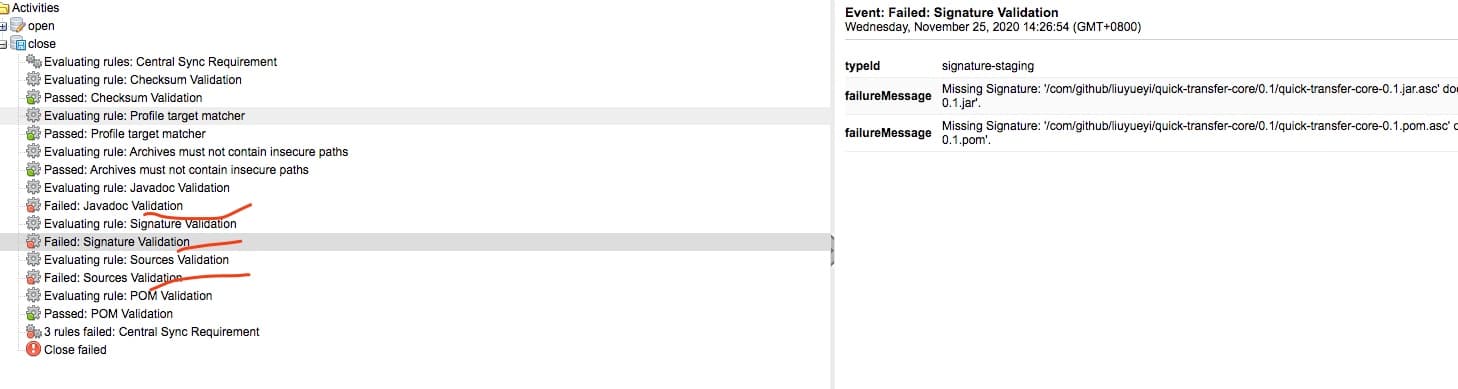
上面几个问题的原因主要在于项目的pom配置有问题,导致上传的包没有签名,没有source, java-doc
其次还遇到过一次说是gpg密钥没有找到的问题,这个有可能是因为我们上传的密钥还没有同步过去,有延迟,再试一次就可以了
5. 小结
虽然网上挺多这种教程,但是在实际的操作中,总会遇到一些别人没有遇到的问题,当然如果没有遇到问题,那当然是最幸运的事情了;本文主要是为了记录jar包上传的中央仓库的全过程,做一个归纳小结,也方便后续的查阅,当然如果对其他的小伙伴能有所帮助也是不错的
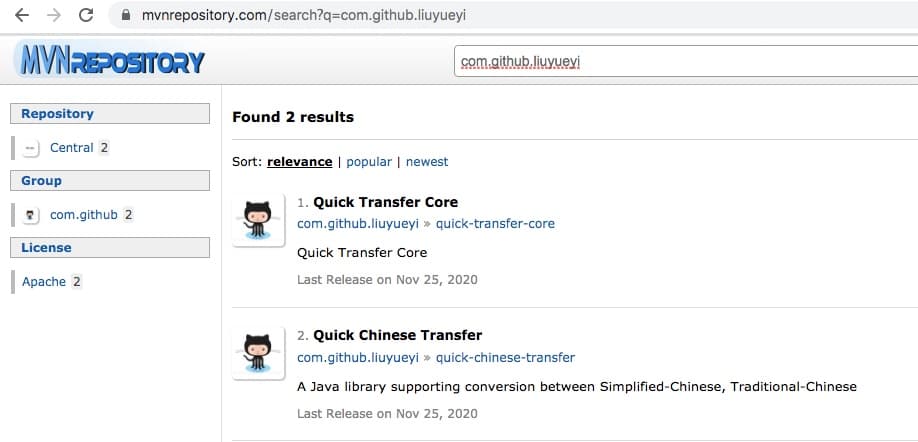
在写本文的时候,已经可以在中央仓库搜索到上传的jar包了
参考文档
II. 其他
一灰灰的个人博客,记录所有学习和工作中的博文,欢迎大家前去逛逛
2. 声明
尽信书则不如,以上内容,纯属一家之言,因个人能力有限,难免有疏漏和错误之处,如发现bug或者有更好的建议,欢迎批评指正,不吝感激
3. 扫描关注
一灰灰blog