190104-Quick-Fix 纯Jar应用及扩展手册

文章目录
  1. I. 环境
    1. 1. GitHub Release版本
    2. 2. 小灰灰私服
  2. III. 使用说明
    1. 1. 配置相关
    2. 2. 请求参数说明
      1. a. 获取某个服务的成员属性值
      2. b. 执行某个服务的方法
      3. c. 执行某个服务的成员属性的某个方法
  3. II. Jar应用使用方式
    1. 1. jar使用姿势
      1. a. 实例演示
      2. b. ServerLoader扩展
  4. II. 其他
    1. 0. 项目
    2. 1. 一灰灰Blog: https://liuyueyi.github.io/hexblog
    3. 2. 声明
    4. 3. 扫描关注

目前Quick-Fix框架提供了两种类型,三中不同场景下的Fixer,一种是以Jar方式启动的,一个是基于Spring生态体系玩法的,下面主要介绍这jar方式,如何使用QuickFix来实现应用内服务调用和数据订正

I. 环境

使用maven可以很方便的引入依赖包,目前提供两种导入方式

1. GitHub Release版本

组要是依赖github上的release版本,因此可以直接去查看对应的源码: https://github.com/liuyueyi/quick-fix/releases

1
2
3
4
5
6
7
8
9
10
11
12
<repositories>
<repository>
<id>jitpack.io</id>
<url>https://jitpack.io</url>
</repository>
</repositories>

<dependency>
<groupId>com.github.liuyueyi</groupId>
<artifactId>quick-fix</artifactId>
<version>0.1</version>
</dependency>

2. 小灰灰私服

个人私服仓库,好处就是更新快,有bug修复也快,而且可以根据需要,只加载指定的jar包,推荐使用这种方式

1
2
3
4
5
6
<repositories>
<repository>
<id>yihui-maven-repo</id>
<url>https://raw.githubusercontent.com/liuyueyi/maven-repository/master/repository</url>
</repository>
</repositories>

III. 使用说明

下面将演示如何在jar应用中使用Quick-Fix, 并且给出了如何通过扩展ServerLoaderTemplateServerLoaderBinder来实现访问应用内实例的demo

1. 配置相关

目前支持通过jvm参数来修改默认绑定的端口号,也支持通过自定义实现的EndPoint来替换默认的基于Socket的HTTP服务器

端口号设置方式

1
-Dquick.fix.port=8080

2. 请求参数说明

标题 解释
请求方法 POST 只支持POST请求
请求头 application/json 请求参数以json串方式提交
请求参数 参数名 参数说明
- service 需要执行的服务,可以是完全路径,可以是beanName
- field 需要访问的服务内部成员属性,值为属性名;为空时,表示执行的服务的某个方法
- method 方法名,需要执行的方法;为空时,表示访问某个服务的成员属性值
- type static 表示访问静态类;其他表示访问Spring Bean
- params 请求参数,数组,可以不存在,格式为类型#值,对于基本类型,可以省略类型的前缀包

一个基本的使用case形如:

1
curl -X POST -H "Content-Type:application/json" http://127.0.0.1:9999/fixer/call -d '{"service": "com.git.hui.fix.example.jar.server.CalculateServer", "method": "getCache", "params": ["init"], "type":"static"}'

针对上面的参数,下面进行组合说明:

a. 获取某个服务的成员属性值

fix-core 默认提供了静态类的访问方式,要求type传值为static;只访问成员属性值,不需要传入method

1
{"service": "com.git.hui.fix.example.jar.server.CalculateServer", "field": "localCache", "type": "static"}

b. 执行某个服务的方法

执行服务的方法时,不要传入field参数,其次params中的参数就是传给需要执行的method方法的,数组格式

  • 当不需要参数时,可以不加params; 或者传一个空数组
  • 参数传入定义如: 参数类型#参数值
    • 基本类型 + BigDecimal/BigInteger时,参数类型可以不写全路径,如 “int#3”, “Float#12.3”, “BigDecimal#123”
    • String类型时,可以省略参数类型,如 “key”
    • 其他类型,参数类型为全路径,value为json格式化的值;因此要求参数类型,可以正常的反序列化(如必须有默认构造方法)
1
{"service": "com.git.hui.fix.example.jar.server.CalculateServer", "method": "updateCache", "type": "static", "params": ["key", "value"]}

c. 执行某个服务的成员属性的某个方法

调用成员属性的方法,可使用的姿势如下,这个时候 service, method, field 都需要存在

1
{"service": "com.git.hui.fix.example.jar.server.CalculateServer", "method": "getUnchecked", "field":"localCache", "type": "static", "params": ["key"]}

II. Jar应用使用方式

如果我的应用时以纯粹的jar方式运行,指定入口,然后一直持续运行,这种场景下,此时我们的应用内外交互则主要会利用fix-core中提供的一个机遇socket的http服务器(com.git.hui.fix.core.endpoint.BasicHttpServer)来通信

1. jar使用姿势

引入依赖包

1
2
3
4
5
<dependency>
<groupId>com.git.hui.fix</groupId>
<artifactId>fix-core</artifactId>
<version>1.0</version>
</dependency>

a. 实例演示

接下来我们创建一个demo应用来演示使用姿势,因为fix-core只提供了StaticServerLoader,即我们只能通过FixerEndPoint执行应用中的静态类,因此我们jar应用可以设计如下

实际使用中需要注意:

  • 需要主动调用 FixEngine.instance();,实现初始化

入口类

1
2
3
4
5
6
7
8
9
10
11
12
13
14
15
16
17
18
19
public class Application {

public static void main(String[] args) {
System.out.println(" --- ");
new Thread(new Runnable() {
@Override
public void run() {
FixEngine.instance();
CalculateServer.updateCache("init", new BigDecimal(12.3f));
}
}).start();

try {
Thread.sleep(2 * 3600 * 1000);
} catch (Exception e) {
Thread.currentThread().interrupt();
}
}
}

测试静态类

1
2
3
4
5
6
7
8
9
10
11
12
13
14
15
16
17
18
19
20
21
22
23
24
25
26
27
28
29
30
31
import com.google.common.cache.CacheBuilder;
import com.google.common.cache.CacheLoader;
import com.google.common.cache.LoadingCache;

import java.math.BigDecimal;

/**
* Created by @author yihui in 22:53 18/12/30.
*/
public class CalculateServer {

private static LoadingCache<String, BigDecimal> localCache;

static {
localCache = CacheBuilder.newBuilder().build(new CacheLoader<String, BigDecimal>() {
@Override
public BigDecimal load(String key) throws Exception {
return BigDecimal.ZERO;
}
});
}


public static BigDecimal getCache(String key) {
return localCache.getUnchecked(key);
}

public static void updateCache(String key, BigDecimal value) {
localCache.put(key, value);
}
}

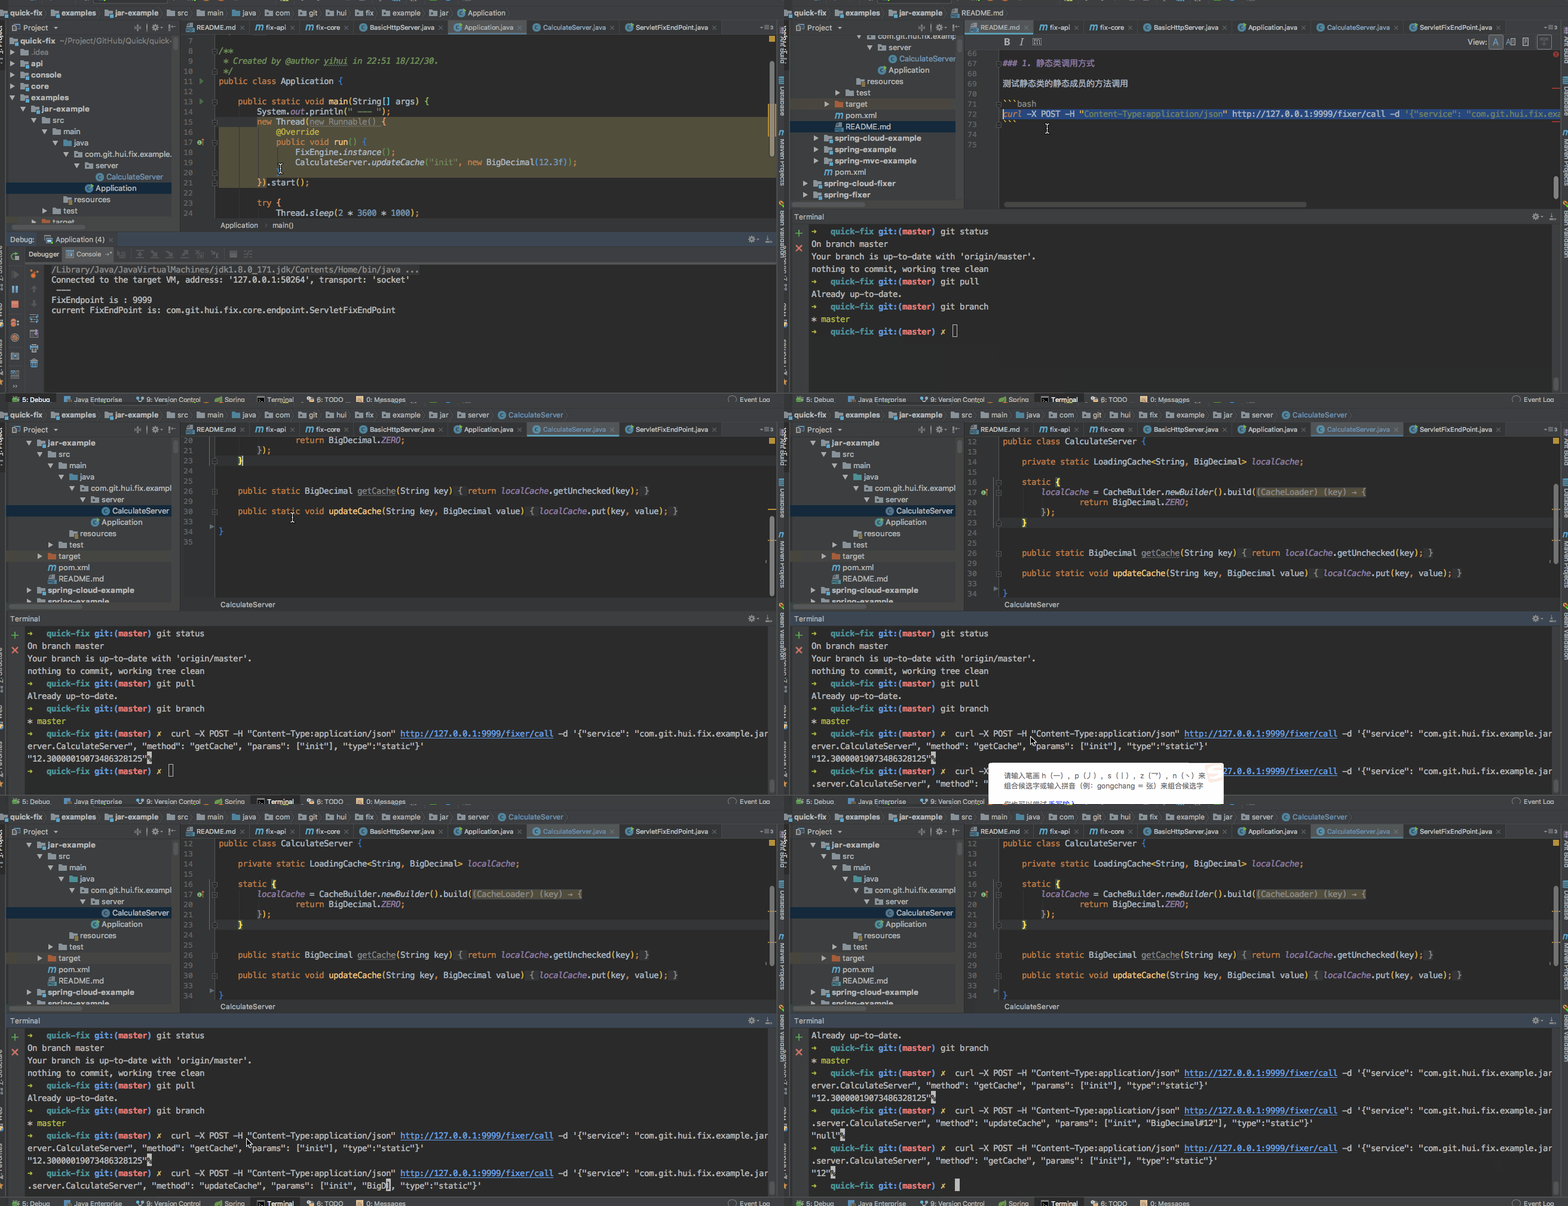
执行上面的main方法之后,会启动默认的http服务器,开启端口号为 9999, 我们通过curl模拟post请求,访问CalculateServer中的值

启动之后,访问命令如下

1
curl -X POST -H "Content-Type:application/json" http://127.0.0.1:9999/fixer/call -d '{"service": "com.git.hui.fix.example.jar.server.CalculateServer", "method": "getCache", "params": ["init"], "type":"static"}'

1.gif

上图演示了启动应用,然后通过http请求来访问应用内部静态类的方法,更新应用内存数据

b. ServerLoader扩展

上面虽然实现了应用内存数据修改,但有个局限是只能操作静态类的方法,如果要操作实例对象呢?

对于存粹的jar应用而言,框架本身很难知道如何获取实例,因此可以通过实现ServerLoader接口,来扩展服务功能

首先假设应用内的所有实例,都保存在ServerHolder这个持有类中,可以通过name来获取对应的实例对象

1
2
3
4
5
6
7
8
9
10
11
12
13
14
15
16
17
18
19
20
21
import java.util.HashMap;
import java.util.Map;

/**
* Created by @author yihui in 22:19 19/1/3.
*/
public class ServerHolder {
public static Map<String, Object> serverCache;

static {
serverCache = new HashMap<>();
}

public static void addServer(String name, Object server) {
serverCache.put(name, server);
}

public static Object getServer(String name) {
return serverCache.get(name);
}
}

接下来实现ServerLoader,用于Quick-Fix框架来查找对应的bean,继承模板类: ServerLoaderTemplate

1
2
3
4
5
6
7
8
9
10
11
12
13
14
15
16
17
18
19
20
21
22
23
24
25
26
27
28
29
30
31
32
import com.git.hui.fix.api.constants.LoaderOrder;
import com.git.hui.fix.api.exception.ServerNotFoundException;
import com.git.hui.fix.api.modal.FixReqDTO;
import com.git.hui.fix.api.modal.ImmutablePair;
import com.git.hui.fix.core.loader.ServerLoaderTemplate;
import com.git.hui.fix.core.util.StringUtils;
import com.git.hui.fix.example.jar.holder.ServerHolder;

/**
* Created by @author yihui in 22:21 19/1/3.
*/
@LoaderOrder(order = 0)
public class SelfServerLoader extends ServerLoaderTemplate {
@Override
public ImmutablePair<Object, Class> loadServicePair(String service) {
Object server = ServerHolder.getServer(service);
if (server == null) {
throw new ServerNotFoundException("not server:" + service + " found!");
}

return ImmutablePair.of(server, server.getClass());
}

@Override
public boolean enable(FixReqDTO reqDTO) {
return StringUtils.isBlank(reqDTO.getType()) || "server".equals(reqDTO.getType());
}

public static SelfServerLoader getLoader() {
return new SelfServerLoader();
}
}

实现自定义的LoaderBinder,用于将所有自定义实现的ServerLoader绑定到框架中

1
2
3
4
5
6
7
8
public class SelfLoaderBinder implements ServerLoaderBinder {
@Override
public List<ServerLoader> getBeanLoader() {
List<ServerLoader> list = new ArrayList<>(1);
list.add(SelfServerLoader.getLoader());
return list;
}
}

针对上面的实现进行说明:

  • 注解 @LoaderOrder 表示ServerLoader的优先级,值越小优先级越大;当多个ServerLoader#enable都返回true时,优先级高的会被采用
  • loadServicePair 这个方法,就是需要实现的根据传入的service来获取对应的实例的具体逻辑;注意返回值时对象与class的组合
  • 因为我们的ServerLoaderBinder采用JDK的SPI机制实现扩展,因此自定义的SelfLoaderBinder需要生效,还的添加配置
    • 在resource目录下,新建目录 META-INF/services
    • 在上面的目录下,新建文件名为 com.git.hui.fix.api.spi.ServerLoaderBinder
    • 在上面的文件中,添加自定义实现类全路径 com.git.hui.fix.example.jar.loader.SelfLoaderBinder

然后写一个测试服务HelloServer

1
2
3
4
5
6
7
8
9
10
11
12
13
14
15
public class HelloServer {
private String title;

public HelloServer(String title) {
this.title = title;
}

public void setTitle(String title) {
this.title = title;
}

public String sayHello() {
return title;
}
}

修改一下启动方法

1
2
3
4
5
6
7
8
9
10
11
12
13
14
15
16
17
18
19
20
21
public class Application {

public static void main(String[] args) {
System.out.println(" --- ");
new Thread(new Runnable() {
@Override
public void run() {
HelloServer helloServer = new HelloServer("小灰灰blog");
ServerHolder.addServer("helloServer", helloServer);
FixEngine.instance();
CalculateServer.updateCache("init", new BigDecimal(12.3f));
}
}).start();

try {
Thread.sleep(2 * 3600 * 1000);
} catch (Exception e) {
Thread.currentThread().interrupt();
}
}
}

然后测试通过Quick-Fix来访问上面的HelloServer服务中的方法

测试case如下

1
2
3
curl -X POST -H "Content-Type:application/json" http://127.0.0.1:9999/fixer/call -d '{"service": "helloServer","method":"setTitle", "params":["一灰灰"]}'

curl -X POST -H "Content-Type:application/json" http://127.0.0.1:9999/fixer/call -d '{"service": "helloServer","method":"sayHello"}'

2.gif

II. 其他

0. 项目

1. 一灰灰Bloghttps://liuyueyi.github.io/hexblog

一灰灰的个人博客,记录所有学习和工作中的博文,欢迎大家前去逛逛

2. 声明

尽信书则不如,已上内容,纯属一家之言,因个人能力有限,难免有疏漏和错误之处,如发现bug或者有更好的建议,欢迎批评指正,不吝感激

3. 扫描关注

一灰灰blog

QrCode

知识星球

goals

评论

Your browser is out-of-date!

Update your browser to view this website correctly. Update my browser now

×