整体设计
上一篇简单的说了一下spi相关的东西, 接下来我们准备开动,本篇博文主要集中在一些术语,使用规范的约定和使用方式
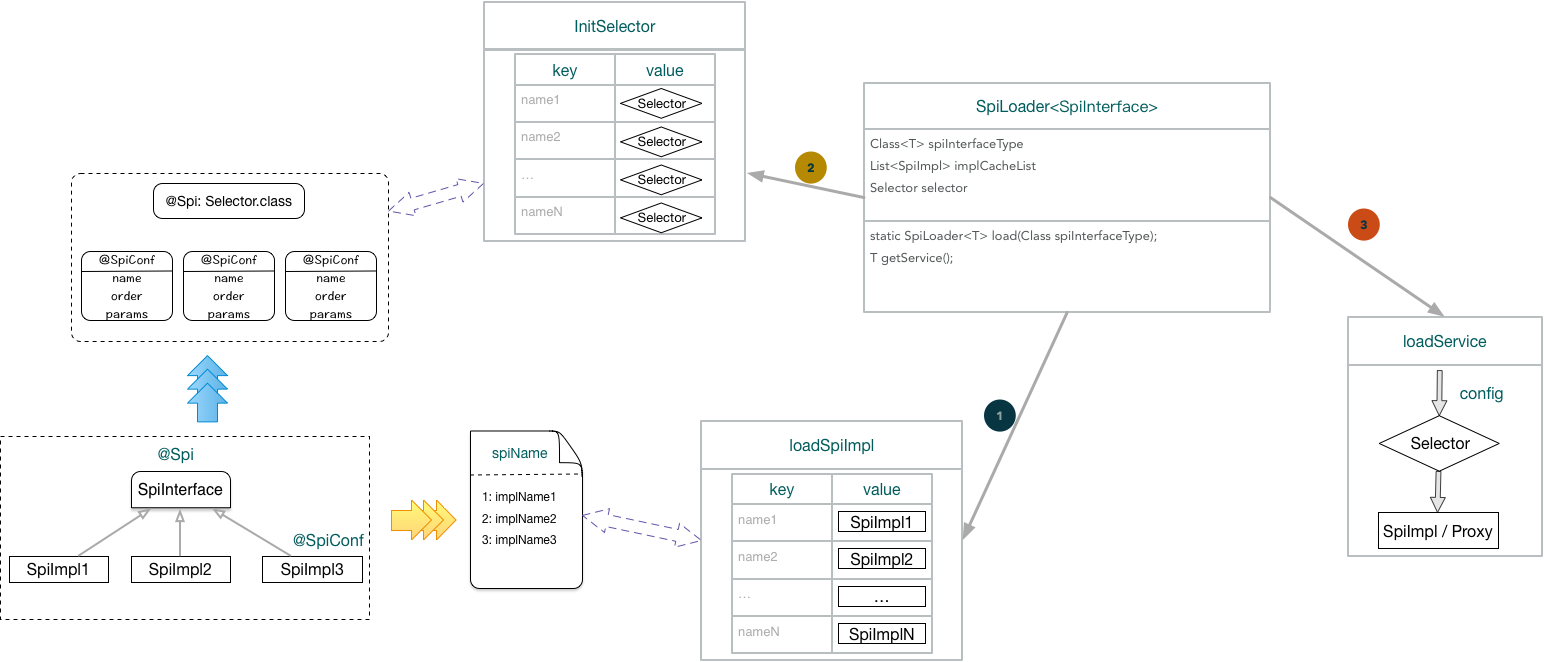
设计思路 下图围绕 SpiLoader 为中心,描述了三个主要的流程:
load所有的spi实现
初始化选择器 selector
获取spi实现类 (or一个实现类代理)
基础类说明
主要介绍一下框架中涉及到的接口和注解,并指出需要注意的点
1. Selector 选择器
为了最大程度的支持业务方对spi实现类的选择,我们定义了一个选择器的概念,用于获取spi实现类
接口定义如下: 1 2 3 public interface ISelector <T > <K> K selector (Map<String, SpiImplWrapper<K>> map, T conf) throws NoSpiMatchException ; }
结合上面的接口定义,我们可以考虑下,选择器应该如何工作?
根据传入的条件,从所有的实现类中,找到一个最匹配的实现类返回
如果查不到,则抛一个异常NoSpiMatchException出去
所以传入的参数会是两个, 一个是所有的实现类列表map(至于上面为什么用map,后续分析),一个是用于判断的输入条件conf
框架中会提供两种基本的选择器实现,
DefaultSelector , 对每个实现类赋予唯一的name,默认选择器则表示根据name来查找实现类ParamsSelector, 在实现类上加上 @SpiConf 注解,定义其中的 params,当传入的参数(conf), 能完全匹配定义的params,表示这个实现类就是你所需要的
自定义实现 自定义实现比较简单,实现上面的接口即可
2. Spi 注解
要求所有的spi接口,都必须有这个注解;
定义如下 主要是有一个参数,用于指定是选择器类型,定义spi接口的默认选择器,
1 2 3 4 5 6 @Target (ElementType.TYPE)@Retention (RetentionPolicy.RUNTIME)@Documented public @interface Spi { Class<? extends ISelector> selector() default DefaultSelector.class ; }
说明 在上一篇《SPI框架实现之旅一》中,使用jdk的spi方式中,并没有使用注解依然可以正常工作,我们这里定义这个注解且要求必需有,出于下面几个考虑
醒目,告诉开发者,这个接口是声明的spi接口, 使用的时候注意下
加入选择器参数,方便用户扩展自己的选择方式
3. SpiAdaptive 注解
对需要自适应的场景,为了满足一个spi接口,应用多重不同的选择器场景,可以加上这个注解;
接口说明 1 2 3 4 5 6 7 8 9 10 11 @Documented @Retention (RetentionPolicy.RUNTIME)@Target ({ElementType.METHOD})public @interface SpiAdaptive { Class<? extends ISelector> selector() default DefaultSelector.class ; }
说明 这个注解内容和 @Spi 基本上一模一样,唯一的区别是一个放在类上,一个放在方法上,那么为什么这么考虑?
@Spi 注解放在类上,更多的表名这个接口是我们定义的一个SPI接口,但是使用方式可以有两种(静态 + 动态确认)@SpiAdaptive 只能在自适应的场景下使用,用于额外指定spi接口中某个方法的选择器 (如果一个spi接口全部只需要一个选择器即可,那么可以不使用这个注解)
如下面的这个例子,print方法和 echo方法其实是等价的,都是采用 DefaultSelector 来确认具体的实现类;而 write 和 pp 方法则是采用 ParamsSelector 选择器;
1 2 3 4 5 6 7 8 9 10 11 12 13 14 15 16 17 18 19 20 @Spi public interface ICode void print (String name, String contet) @SpiAdaptive void echo (String name, String content) @SpiAdaptive (selector = ParamsSelector.class ) void write (Context context , String content ) ; @SpiAdaptive (selector = ParamsSelector.class ) void pp (Context context , String content ) ;}
4. SpiConf 注解
这个主键主要是用在实现类上(或实现类的方法上),里面存储一些选择条件,通常是和Selector搭配使用
定义如下 定义了三个字段:
name 唯一标识,用于 DefaultSelector;
params 参数条件, 用于 ParamsSelector;
order : 优先级, 主要是为了解决多个实现类都满足选择条件时, 应该选择哪一个 (谈到这里就有个想法, 通过一个参数,来选择是否让满足条件的全部返回)
1 2 3 4 5 6 7 8 9 10 11 12 13 14 15 16 17 18 19 20 21 22 23 24 25 26 27 28 29 30 @Documented @Retention (RetentionPolicy.RUNTIME)@Target ({ElementType.TYPE, ElementType.METHOD})public @interface SpiConf { String name () default "" ; String[] params() default {}; int order () default -1 }
说明 SpiConf 注解可以修饰类,也可以修饰方法,因此当一个实现类中,类和方法都有这个注解时, 怎么处理 ?
以下面的这个测试类进行说明
1 2 3 4 5 6 7 8 9 10 11 12 13 14 15 16 17 18 19 20 21 22 23 24 25 26 27 28 29 30 31 32 33 34 35 @SpiConf (params = "code" , order = 1 )public class ConsoleCode implements ICode @Override public void print (String name, String contet) System.out.println("console print:--->" + contet); } @Override @SpiConf (name = "consoleEcho" ) public void echo (String name, String content) System.out.println("console echo:---->" + content); } @Override @SpiConf (params = {"type:console" }, order = 3 ) public void write (Context context, String content) System.out.println("console write:---->" + content); } }
在设计中,遵循下面几个原则:
类上的SpiConf注解, 默认适用与类中的所有方法
方法上有SpiConf注解,采取下面的规则
方法注解声明name时,两个会同时生效,即想调用上面的echo方法, 通过传入 ConsoleCode(类注解不显示赋值时,采用类名代替) 和 consoleEcho 等价
方法注解未声明name时,只能通过类注解上定义的name(or默认的类名)来选择
order,取最高优先级,如上面的 write 方法的优先级是 1; 当未显示定义order时,以定义的为准
params: 取并集,即要求类上 + 方法上的条件都满足
SPI加载器
spi加载器的主要业务逻辑集中在 SpiLoader 类中,包含通过spi接口,获取所有的实现类; 获取spi接口对应的选择器 (包括类对应的选择器, 方法对应的选择器); 返回Spi接口实现类(静态确认的实现类,自适应的代理类)
从上面的简述,基本上可以看出这个类划分为三个功能点, 下面将逐一说明,本篇博文主要集中在逻辑的设计层,至于优化(如懒加载,缓存优化等) 放置下一篇博文单独叙述
1. 加载spi实现类
这一块比较简单,我们直接利用了jdk的 ServiceLoader 来根据接口,获取所有的实现类;因此我们的spi实现,需要满足jdk定义的这一套规范
具体的代码业务逻辑非常简单,大致流程如下
1 2 3 4 5 6 7 8 9 10 11 12 13 14 15 16 17 if (null == spiInterfaceType) { throw new IllegalArgumentException("common cannot be null..." ); } if (!spiInterfaceType.isInterface()) { throw new IllegalArgumentException("common class:" + spiInterfaceType + " must be interface!" ); } if (!withSpiAnnotation(spiInterfaceType)) { throw new IllegalArgumentException("common class:" + spiInterfaceType + " must have the annotation of @Spi" ); } ServiceLoader<T> serviceLoader = ServiceLoader.load(spiInterfaceType); for (T spiImpl: serviceLoader) { }
注意
因为使用了jdk的标准,因此每定义一个spi接口,必须在 META_INF.services 下新建一个文件, 文件名为包含包路径的spi接口名, 内部为包含包路径的实现类名
每个spi接口,要求必须有 @Spi 注解
Spi接口必须是 interface 类型, 不支持抽象类和类的方式
拓展 虽然这里直接使用了spi的规范,我们其实完全可以自己定义标准的,只要能将这个接口的所有实现类找到, 怎么实现都可以由你定义
如使用spring框架后,可以考虑通过 applicationContext.getBeansOfAnnotaion(xxx ) 来获取所有的特定注解的bean,这样就可以不需要自己新建一个文件,来存储spi接口和其实现类的映射关系了
构建spi实现的关系表 上面获取了spi实现类,显然我们的目标并不局限于简单的获取实现类,在获取实现类之后,还需要解析其中的 @SpiConf 注解信息,用于表示要选择这个实现,必须满足什么样的条件
SpiImplWrapper : spi实现类,以及定义的各种条件的封装类
注解的解析过程流程如下:
name: 注解定义时,采用定义的值; 否则采用简单类名 (因此一个系统中不允许两个实现类同名的情况)
order: 优先级, 注解定义时,采用定义的值;未定义时采用默认;
params: 参数约束条件, 会取类上和方法上的并集(原则上要求类上的约束和方法上的约束不能冲突)
1 2 3 4 5 6 7 8 9 10 11 12 13 14 15 16 17 18 19 20 21 22 23 24 25 26 27 28 29 30 31 32 33 34 35 36 37 38 39 40 41 42 43 44 45 46 47 48 49 50 51 52 List<SpiImplWrapper<T>> spiServiceList = new ArrayList<>(); spiConf = t.getClass().getAnnotation(SpiConf.class ) ; Map<String, String> map; if (spiConf == null ) { implName = t.getClass().getSimpleName(); implOrder = SpiImplWrapper.DEFAULT_ORDER; if (currentSelector.getSelector() instanceof ParamsSelector) { throw new IllegalStateException("spiImpl must contain annotation @SpiConf!" ); } map = Collections.emptyMap(); } else { implName = spiConf.name(); if (StringUtils.isBlank(implName)) { implName = t.getClass().getSimpleName(); } implOrder = spiConf.order() < 0 ? SpiImplWrapper.DEFAULT_ORDER : spiConf.order(); map = parseParms(spiConf.params()); } spiServiceList.add(new SpiImplWrapper<>(t, implOrder, implName, map)); private Map<String, String> parseParms (String[] params) if (params.length == 0 ) { return Collections.emptyMap(); } Map<String, String> map = new HashMap<>(params.length); String[] strs; for (String param : params) { strs = StringUtils.split(param, ":" ); if (strs.length >= 2 ) { map.put(strs[0 ].trim(), strs[1 ].trim()); } else if (strs.length == 1 ) { map.put(strs[0 ].trim(), null ); } } return map; }
2. 初始化选择器
我们的选择器会区分为两类,一个是类上定义的选择器, 一个是方法上定义的选择器; 在自适应的使用方式中,方法上定义的优先级 > 类上定义
简单来讲,初始化选择器,就是扫一遍SPI接口中的注解,实例化选择器后,缓存住对应的结果, 实现如下
1 2 3 4 5 6 7 8 9 10 11 12 13 14 15 16 17 18 19 20 21 22 23 24 25 26 27 28 29 30 31 32 33 34 35 36 37 38 39 40 41 42 43 44 45 46 47 48 49 50 51 52 53 54 55 56 57 58 59 60 61 62 63 64 65 66 67 68 69 70 71 private SelectorWrapper currentSelector;private Map<String, SelectorWrapper> currentMethodSelector;private ConcurrentHashMap<Class, SelectorWrapper> selectorInstanceCacheMap = new ConcurrentHashMap<>(); private void initSelector () Spi ano = spiInterfaceType.getAnnotation(Spi.class ) ; if (ano == null ) { currentSelector = initSelector(DefaultSelector.class ) ; } else { currentSelector = initSelector(ano.selector()); } Method[] methods = this .spiInterfaceType.getMethods(); currentMethodSelector = new ConcurrentHashMap<>(); SelectorWrapper temp; for (Method method : methods) { if (!method.isAnnotationPresent(SpiAdaptive.class )) { continue ; } temp = initSelector(method.getAnnotation(SpiAdaptive.class ).selector ()) ; if (temp == null ) { continue ; } currentMethodSelector.put(method.getName(), temp); } } private SelectorWrapper initSelector (Class<? extends ISelector> clz) if (selectorInstanceCacheMap.containsKey(clz)) { return selectorInstanceCacheMap.get(clz); } try { ISelector selector = clz.newInstance(); Class paramClz = null ; Type[] types = clz.getGenericInterfaces(); for (Type t : types) { if (t instanceof ParameterizedType) { paramClz = (Class) ((ParameterizedType) t).getActualTypeArguments()[0 ]; break ; } } Assert.check(paramClz != null ); SelectorWrapper wrapper = new SelectorWrapper(selector, paramClz); selectorInstanceCacheMap.putIfAbsent(clz, wrapper); return wrapper; } catch (Exception e) { throw new IllegalArgumentException("illegal selector defined! yous:" + clz); } }
说明
SeectorWrapper 选择器封装类
这里我们在获取选择器时,特意定义了一个封装类,其中包含具体的选择器对象,以及所匹配的参数类型,因此可以在下一步通过选择器获取实现类时,保证传入的参数类型合法
private SelectorWrapper initSelector(Class<? extends ISelector> clz) 具体的实例化选择器的方法
从实现来看,优先从选择器缓存中获取选择器对象,这样的目的是保证一个spi接口,每种类型的选择器只有一个实例;因此在自定义选择器中,你完全可以做一些选择判断的缓存逻辑,如 ParamsSelector 中的spi实现类的有序缓存列表
currentSelector , currentMethodSelector, selectorInstanceCacheMap
currentSelector: 对应的是类选择器,每个SPI接口必然会有一个,作为打底的选择器
currentMethodSelector: 方法选择器映射关系表,key为方法名,value为该方法对应的选择器; 所以spi接口中,不支持重载
selectorInstanceCacheMap: spi接口所有定义的选择器映射关系表,key为选择器类型,value是实例;用于保障每个spi接口中选择器只会有一个实例
3. 获取实现类
对使用者而言,最关注的就是这个接口,这里会返回我们需要的实现类(or代理);内部的逻辑也比较清楚,首先确定选择器,然后通过选择器便利所有的实现类,把满足条件的返回即可
从上面的描述可以看到,主要分为两步
获取选择器
根据选择器,遍历所有的实现类,找出匹配的返回
获取选择器 初始化选择器之后,我们会有 currentSelector , currentMethodSelector 两个缓存
静态确定spi实现时,直接用 currentSelector 即可 (spi接口中所有方法都公用类定义选择器)
动态适配时, 根据方法名在 currentMethodSelector 中获取选择器,如果没有,则表示该方法没有@SpiAdaptive注解,直接使用类的选择器 currentMethodSelector 即可
1 2 3 4 5 6 7 8 9 10 11 12 13 14 15 SelectorWrapper selector = currentMethodSelector.get(methodName); if (selector == null ) { selector = currentSelector; currentMethodSelector.putIfAbsent(methodName, selector); } if (!selector.getConditionType().isAssignableFrom(conf.getClass())) { if (!(conf instanceof String)) { throw new IllegalArgumentException("conf spiInterfaceType should be sub class of [" + currentSelector.getConditionType() + "] but yours:" + conf.getClass()); } selector = DEFAULT_SELECTOR; }
选择实现类 这个的主要逻辑就是遍历所有的实现类,判断是否满足选择器的条件,将第一个找到的返回即可,所有的业务逻辑都在 ISelector 中实现,如下面给出的默认选择器,根据name来获取实现类
1 2 3 4 5 6 7 8 9 10 11 12 13 14 15 16 17 18 19 20 21 22 23 24 25 26 public class DefaultSelector implements ISelector <String > @Override public <K> K selector (Map<String, SpiImplWrapper<K>> map, String name) throws NoSpiMatchException { if (StringUtils.isBlank(name)) { throw new IllegalArgumentException("spiName should not be empty!" ); } if (map == null || map.size() == 0 ) { throw new IllegalArgumentException("no impl spi!" ); } if (!map.containsKey(name)) { throw new NoSpiMatchException("no spiImpl match the name you choose! your choose is: " + name); } return map.get(name).getSpiImpl(); } }
流程说明
上面主要就各个点单独的进行了说明,看起来可能比较分散,看完之后可能没有一个清晰的流程,这里就整个实现的流程顺一遍,主要从使用者的角度出发,当定义了一个SPI接口后,到获取spi实现的过程中,上面的这些步骤是怎样串在一起的
流程图 先拿简单的静态获取SPI实现流程说明(动态的其实差不多,具体的差异下一篇说明),先看下这种用法的使用姿势
1 2 3 4 5 6 7 8 9 10 11 12 13 14 15 16 17 18 19 20 21 22 23 24 25 26 @Spi public interface IPrint void print (String str) } public class FilePrint implements IPrint @Override public void print (String str) System.out.println("file print: " + str); } } public class ConsolePrint implements IPrint @Override public void print (String str) System.out.println("console print: " + str); } } @Test public void testPrint () throws NoSpiMatchException SpiLoader<IPrint> spiLoader = SpiLoader.load(IPrint.class ) ; IPrint print = spiLoader.getService("ConsolePrint" ); print.print("console---->" ); }
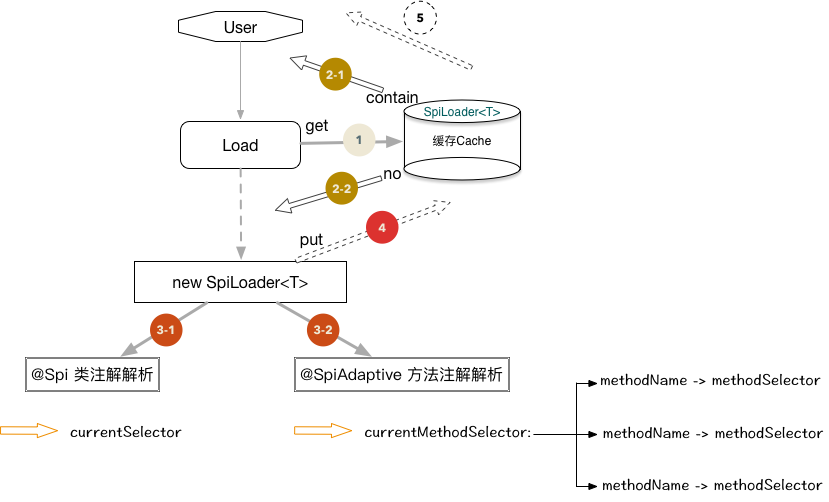
SpiLoader<IPrint> spiLoader = SpiLoader.load(IPrint.class);这行代码触发的action 主要是初始化所有的选择器, 如下图
首先从缓存中查
是否已经初始化过了有则直接返回;
缓存中没有,则进入new一个新的对象出来
解析类上注解 @Spi,初始化 currentSelector
解析所有方法的注解 @SpiAdaptive , 初始化 currentMethodSelector
塞入缓存,并返回
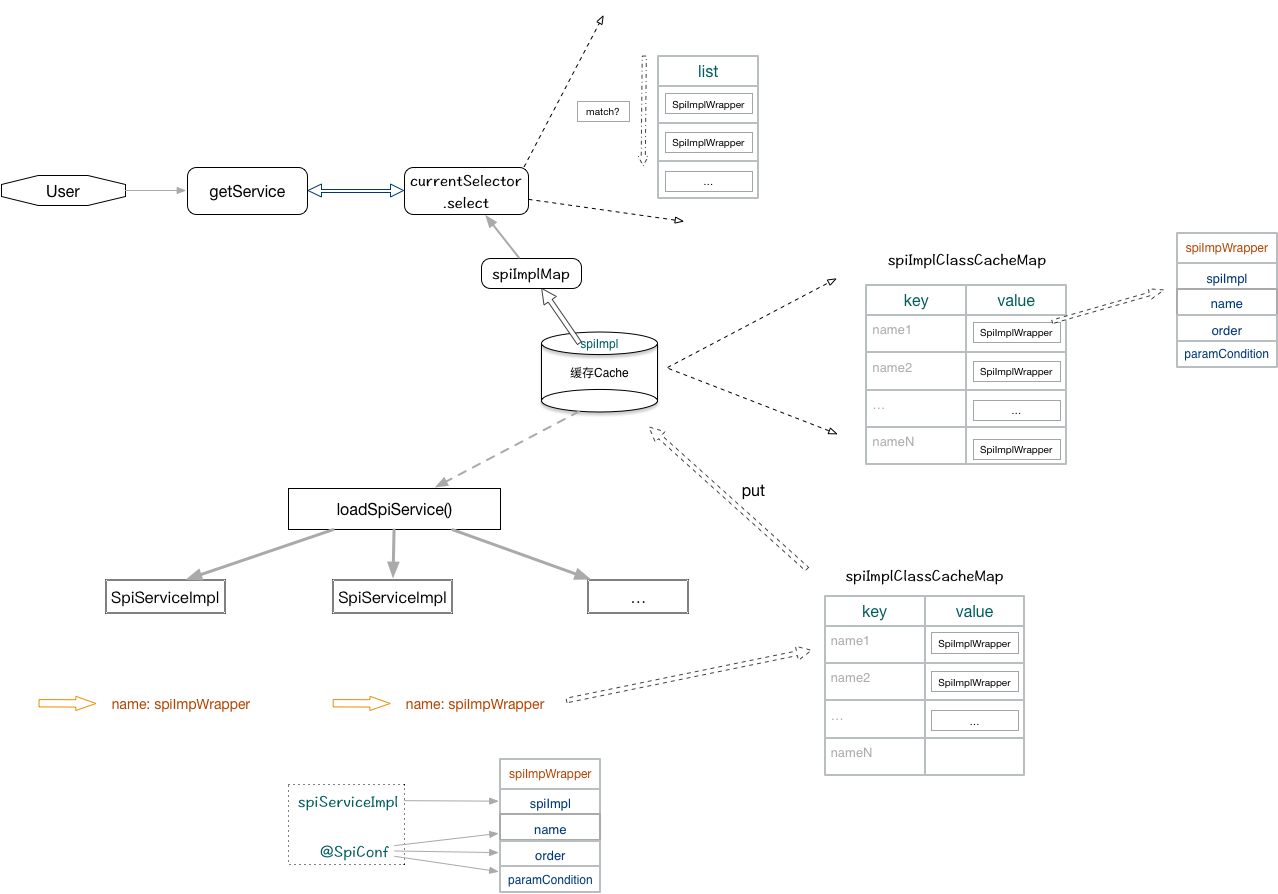
IPrint print = spiLoader.getService("ConsolePrint");根据name获取实现类,具体流程如下
判断是否加载过所有实现类 spiImplClassCacheMap
没有加载,则重新加载所有的实现类
通过jdk的 ServiceLoader.load() 方法获取所有的实现类
遍历实现类,根据 @SpiConf 注解初始化参数,封装 SpiImplWrapper对象
保存封装的 SpiImplWrapper对象到缓存
执行 currentSelector.select() 方法,获取匹配的实现类
其他 博客系列链接:
项目: QuickAlarm
基于hexo + github pages搭建的个人博客,记录所有学习和工作中的博文,欢迎大家前去逛逛
声明 尽信书则不如,已上内容,纯属一家之言,因本人能力一般,见识有限,如发现bug或者有更好的建议,随时欢迎批评指正,我的微博地址: 小灰灰Blog
扫描关注


